The aim of this tutorial is giving an introduction into making custom UIs for dota 2 using flash/scaleform. This is a very flexible way of making UIs, so there are lots of possibilities.
This tutorial will go over the files needed for making UIs work ingame, and give a small flash tutorial on how to get your UI working. We will also have a look at letting your UI and
vsript work together. Remember: flash is very flexible, so your
imagination and creativity is the limit here.
Basic OOP programming knowledge is assumed.
For this tutorial I will use Adobe Flash CS6, but any program that compiles
swf files will do.
Console command to enable scaleform output to console: 'scaleform_spew 1'
A list of scaleform functionality can be found on the wiki.
Credits for figuring out pretty much everything we know about this topic go to Ash47
We've seen the possibilities of the server sided vscript - which is cool - but to add more functionality, the ingame mechanics are not always enough. To remedy this the dota 2
engine presents us with the possibility of adding custom panels and functionality to the user interface. This custom UI exposes a big list of scaleform functions,a full reference
can be found here.
So where can we find the UI files? A custom UI belongs to an addon, so is placed inside its folder. For a custom UI you only need two files, in resource/flash3/ you will first
of all need custom_ui.txt. This file tells the engine what file to load as custom UI. Most of the file is commented out, it is just information. The only imporant lines in custom_ui.txt
are the upper lines, which look like this:
"CustomUI"
{
    "1"
    {
        "File"      "CustomUIFileName1" //for example: "UI1", if your swf file is called UI1.swf
        "Depth"     "51"
    }
}
As you can see it would be possible to add multiple different UI files by adding multiple entries. This is usually not needed however, you can add multiple elements in one file,
and al your panels in one file might be a good way to keep your work organised. If you want your elements at different depths you will
have to add more entries though.You can find the full skeleton here, it contains everything you need to compile your UI: https://github.com/Perryvw/SkeletonFlashUI.
This file also contains the folders ValveLib and scaleform. Without these two folders, your UI will not compile!
For reference: here is the code of the main class of the skeleton file, remember this is absolutely essential.
package {
    import flash.display.MovieClip;

    //import some stuff from the valve lib
    import ValveLib.Globals;
    import ValveLib.ResizeManager;

    public class CustomUI extends MovieClip{

        //these three variables are required by the engine
        public var gameAPI:Object;
        public var globals:Object;
        public var elementName:String;

        //constructor, you usually will use onLoaded() instead
        public function CustomUI() : void {
        }

        //this function is called
        public function onLoaded() : void {
            //make this UI visible
            visible = true;

            //let the client rescale the UI
            Globals.instance.resizeManager.AddListener(this);

            //this is not needed, but it shows you your UI has loaded (needs 'scaleform_spew 1' in console)
            trace("Custom UI loaded!");
        }

        //this handles the resizes, it sets the UI dimensions to your screen dimensions, credits to Nullscope
        public function onResize(re:ResizeManager) : * {
            //Calculate scale ratio
			var scaleRatioY:Number = re.ScreenHeight/900;

			//If the screen is bigger than our stage, keep elements the same size (you can remove this)
			if (re.ScreenHeight > 900){
				scaleRatioY = 1;
			}

            //You will probably want to scale your elements by here, they keep the same width and height by default.

            //The engine keeps elements at the same X and Y coordinates even after resizing, you will probably want to adjust that here.
        }
    }
}
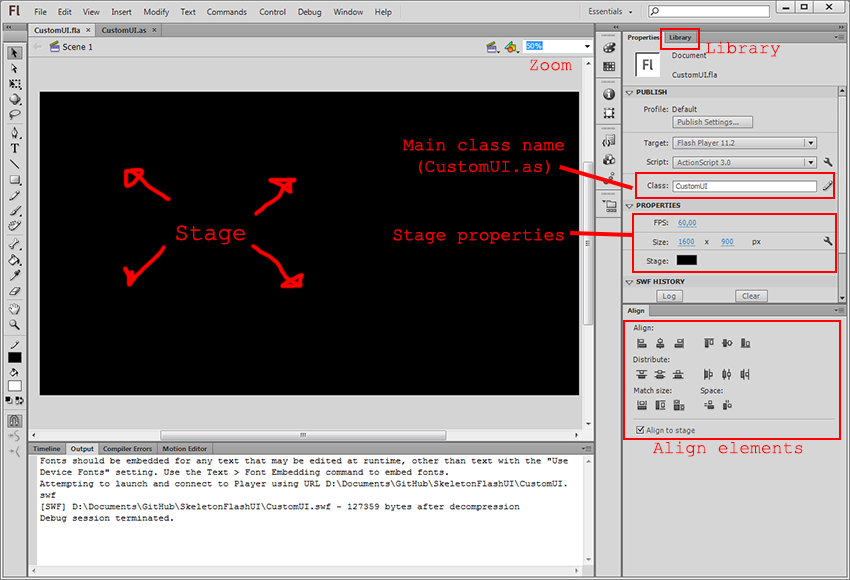
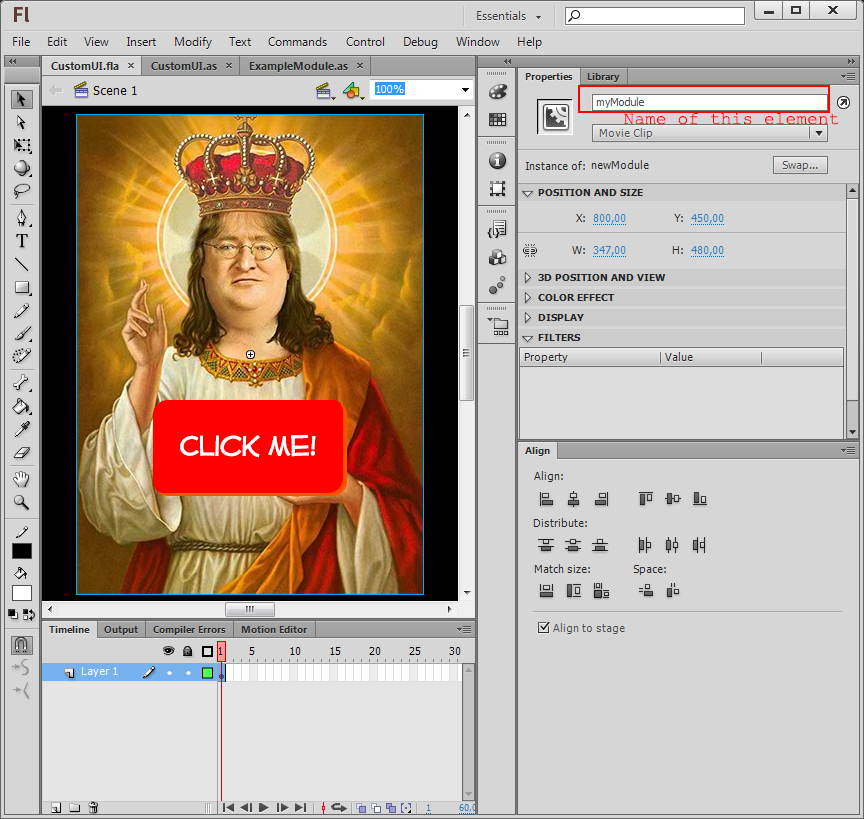
To compile your UI you need to open it in Flash. For people not familiar with Flash here's a short rundown of the important bits:
 somewhere in your console.
You will not see anything ingame, because nothing that shows ingame was added yet, you can try drawing something on the stage and it will show up.
somewhere in your console.
You will not see anything ingame, because nothing that shows ingame was added yet, you can try drawing something on the stage and it will show up.
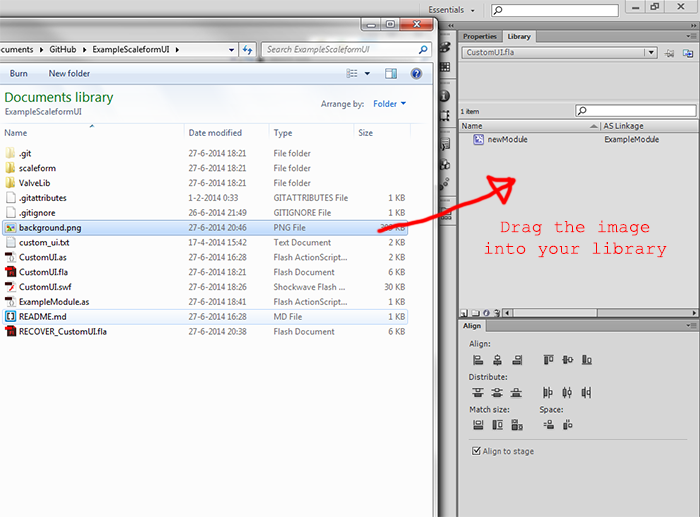
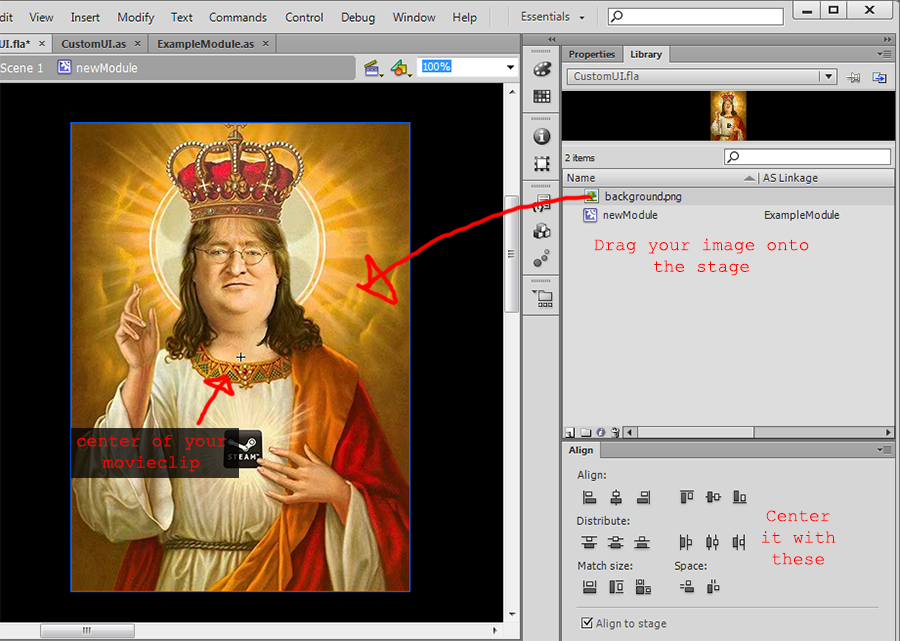
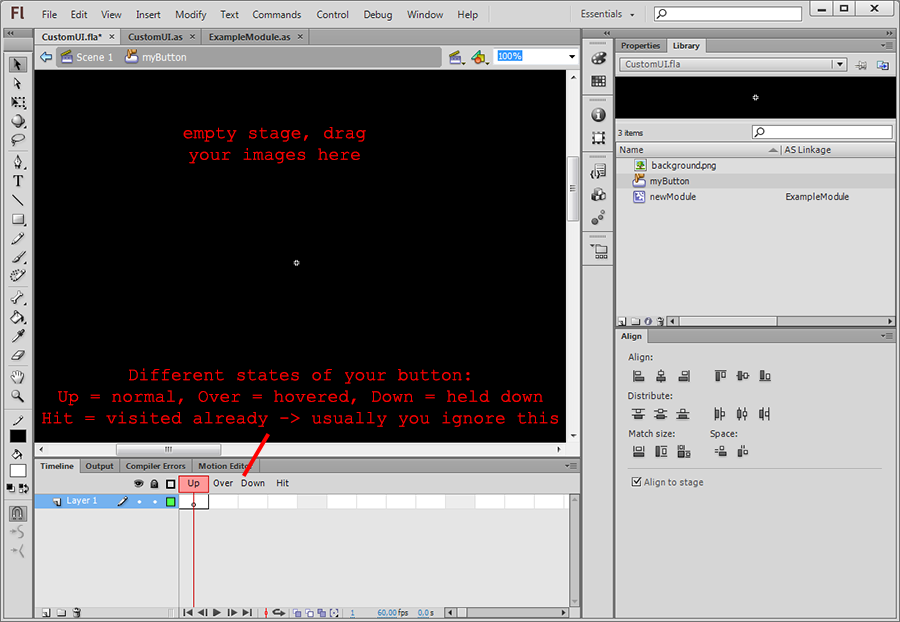
For the sake of this tutorial I will explain things by example. I will add a small panel with a button, that prints a message in console when the button is clicked. For demonstration purposes
I will also give the dialogue a background image, to show how to import resources into your UI. I will put a link to the end result at the end of this page.
So let's get started:
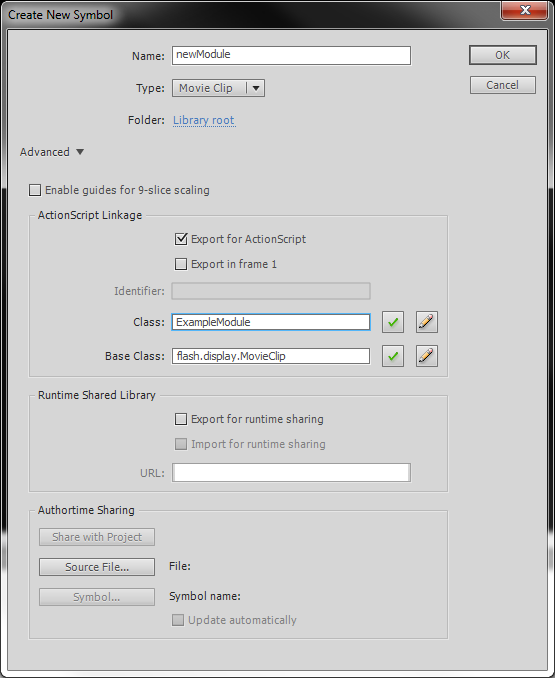
package  {
    import flash.display.MovieClip;

    public class ExampleModule extends MovieClip {

        public function ExampleModule() {
            // constructor code
        }
    }
}
Now this doesn't do very much, so to start out easy we will an output message when the button is clicked. This is my modified module actionscript with explanations:
package  {

    import flash.display.MovieClip;
    //we have to import mouse events so flash knows what we're talking about
    import flash.events.MouseEvent;

    public class ExampleModule extends MovieClip {

        public function ExampleModule() {
            //we add a listener to this.button1 (I called my button 'button1')
            //this listener listens to the CLICK mouseEvent, and when it observes it, it cals onButtonClicked
            this.button1.addEventListener(MouseEvent.CLICK, onButtonClicked);
        }

        /*this function is new, it is the handler for our listener
         *handlers for mouseEvents always need the event:MouseEvent parameter.
         *the ': void' at the end gives the type of this function, handlers are always voids. */
        private function onButtonClicked(event:MouseEvent) : void {
            trace("click!");
        }
    }

}
Easy huh? Try compiling your swf again and test. Every time you click the button you should get a line of output in your output window.
public function onResize(re:ResizeManager) : * {
    //Calculate scale ratio
	var scaleRatioY:Number = re.ScreenHeight/900;

	//If the screen is bigger than our stage, keep elements the same size (you can remove this)
	if (re.ScreenHeight > 900){
		scaleRatioY = 1;
	}

    //pass the resize event to our module, we pass the width and height of the screen, as well as the correctedRatio.
    this.myModule.screenResize(re.ScreenWidth, re.ScreenHeight, scaleRatioY);
}
So now we have to define the screenResize(...) function inside our module.as. I have just added this function to the file, the comments give explanation://we define a public function, because we call it from outside our module object. //we get four parameters, the stage's dimensions and the scale ratios. Flash does not have floats, we use Number for that. //you might wonder what happened to the ': void'. Whenever that is not added, void is assumed public function screenResize(stageW:int, stageH:int, scaleRatio:Number){ //we set the position of this movieclip to the center of the stage //remember, the black cross in the center is our center. You control the alignment with this code, you can align your module however you like. this.x = stageW/2; this.y = stageH/2; //Let's say we want our element to scale proportional to the screen height, scale like this: this.scaleX = this.originalXScale * scaleRatio; this.scaleY = this.originalYScale * scaleRatio; }You can try this ingame after compiling and you will see this element will always be centered and it will grow/shrink when rescaling
To make use of your custom UI panel in your agame mode you will need some way of communicating its results to your server vscript, and you will possibly also want that
UI to get some data from the server script to display.
For this part of the tutorial we will add some functionality to the button we created before. For this example we will
make the button 'buy' ability points. This means we will deduct the player's money and give him one extra ability point to spend. Once the player is out of money we would like
to remove the button and display a message that there is not enough money anymore.
Upon inspecting function we can see there are two parts. Firstly communicating when the player clicks
the button from the UI to your vscript. Secondly we want to send back if the player has enough money left. We will go over both ways of communication separately.
Flash
First up is sending a message from our UI to our server script. This is done by registering a command in our vscript, and executing that command when the button is pressed in our UI.
Recall the click handler in our module. This is what it currently looks like:
private function onButtonClicked(event:MouseEvent) : void {
    trace("click!");
}
We would like to call the command instead of the trace, so we change it to this:
private function onButtonClicked(event:MouseEvent) : void {
    //Send the 'BuyAbilityPoint' command to the server. We do not need the 1, but I left it in as a parameter you can pass with your command.
    If you want to multiple ability points with one click for example, you can pass the number of points instead of this 1.
    this.gameAPI.SendServerCommand("BuyAbilityPoint 1");
}
Now this modification causes a bit of a problem, because we do not have access to the gameAPI object inside our module. To solve this by adding a variable to store
the gameAPI object in, and a setup() function to put the right value into that variable. After changing this, the top of our module file will look like this (I left out
some parts that didn't change and replaced them with ...):... public class ExampleModule extends MovieClip { //hold the gameAPI var gameAPI:Object; public function ExampleModule() { this.button1.addEventListener(MouseEvent.CLICK, onButtonClicked); } //set initialise this instance's gameAPI public function setup(api:Object) { this.gameAPI = api; } private function onButtonClicked(event:MouseEvent) : void { this.gameAPI.SendServerCommand("BuyAbilityPoint 1"); } ...We will have to call the setup( ) ourselves from our mainclass, because that is where we get the gameAPI from the engine. We do this in the onLoaded function, because we know for sure the gameAPI object is available there. I just modified it to look like this:
//this function is called when the UI is loaded
public function onLoaded() : void {
    //make this UI visible
    visible = true;

    //let the client rescale the UI
    Globals.instance.resizeManager.AddListener(this);

    //this is not needed, but it shows you your UI has loaded (needs 'scaleform_spew 1' in console)
    trace("Custom UI loaded!");

    //pass the gameAPI on to the module
    this.myModule.setup(this.gameAPI);
}
Vscript
--register the 'BuyAbilityPoint' command in our console
Convars:RegisterCommand( "BuyAbilityPoint", function(name, p)
    --get the player that sent the command
    local cmdPlayer = Convars:GetCommandClient()
    if cmdPlayer then
        --if the player is valid, execute PlayerBuyAbilityPoint
        return self:PlayerBuyAbilityPoint( cmdPlayer, p )
    end
end, "A player buys an ability point", 0 )
It would actually be neater to make one function that registers all commands, so you only have to call that one function from your init, but I am trying to minimize the pseudo-code in this tutorial.
function CustomGameMode:PlayerBuyAbilityPoint( player, p)
    --NOTE: p contains our parameter (the '1') now (as a string not a number), we just don't use it

    --determine a price for the ability point, you probably should do this globally
    local price = 200;

    --get the player's ID
    local pID = player:GetPlayerID()

    --get the players current gold
    local playerGold = PlayerResource:GetGold( pID )

    --check if the player has enough gold, checking extra doesn't hurt
    if playerGold >= price then
        --spend the gold
        PlayerResource:SpendGold( pID, price, 0 )
        --add the ability point to the player
        local playerHero = player:GetAssignedHero()
        playerHero:SetAbilityPoints(playerHero:GetAbilityPoints() + 1)
    end
end
Once you have these functions in place you should be all set to test and see if it actually works. Note that you do need to have selected a hero! So: jointeam good
Now we can communicate from the UI to the server script we can have any functionality we want, it is however not very responsive. To remedy this we would also like to
send messages from our vscript to the UI. Doing this we can dynamically add/remove modules on the stage, or just make existing modules visible or invisible. In our case we could
use it to let the UI know when we can not buy ability points anymore. This means we could disable the button or let the player know he does not have enough money anymore.
Custom events
This communication is not very straightforward however. The only way to get data from our vscript to the UI is to listen to game events in the UI. Now we are lucky we can make our
own events, allowing us to send whatever we want to the UI. In this case I would like an event called player_gold_changed which contains the player_ID and gold_amount.
These custom events are defined in scripts/custom_events.txt in your addon directory. So open up this file and add the following event:
//cgm stands for customGameMode, it is a good idea to give your events a custom prefix so you don't accidentally cause collisions with existing events.
"cgm_player_gold_changed"
{
    //define the name of the parameter and the type, we use a short for these values (16 bit integer)
    "player_ID"        "short"
    "gold_amount"    "short"
}
I feel I have to clarify my design decision here: I could have just passed a boolean signifying if the player has enough gold. Instead I chose to pass the actual gold amount, which means that if I would have multiple buttons, all with different 'prices', we could disable them judging on the gold amount the player still has.
function CvHGameMode:PlayerBuyAbilityPoint( player, p)
    local price = 200;
    local pID = player:GetPlayerID()
    local playerGold = PlayerResource:GetGold( pID )

    if playerGold >= price then
        PlayerResource:SpendGold( pID, price, 0 )
        local playerHero = player:GetAssignedHero()
        playerHero:SetAbilityPoints(playerHero:GetAbilityPoints() + 1)
    end

    --Fire the event. The second parameter is an object with all the event's parameters as properties
    --We have to get the player's gold again, because we have deducted the price from it since the last time we got it.
    FireGameEvent('cgm_player_gold_changed', { player_ID = pID, gold_amount = PlayerResource:GetGold( pID ) })
end
Flash
public function setup(api:Object, globals:Object) {
    this.gameAPI = api;
    //added globals to this module too (don't forget the variable!), we need it now
    this.globals = globals;

    //this is our listener for the event, onGoldUpdate() is the handler
    this.gameAPI.SubscribeToGameEvent("cgm_player_gold_changed", this.onGoldUpdate);
}
We will keep the onGoldUpdate( ) function that handles the event simple for now, but you can do whatever you want here, animate elements in and out, add filters, whatever you come
up with is probably possible. We will however just remove the button when the user does not have enough money anymore. Usually you would just disable it temporarily, but for now
this is nice and simple. onGoldUpdate( ) looks like this:
public function onGoldUpdate(args:Object) : void {
    //get the ID of the player this UI belongs to, here we use a scaleform function from globals
    var pID:int = globals.Players.GetLocalPlayer();

    //check of the player in the event is the owner of this UI. Note that args are the parameters of the event
    if (args.player_ID == pID) {
        //if we can not afford another ability point, we will remove the button
        if (args.gold_amount < 200) {
            this.removeChild(this.button1);
        }
    }
}
You are done now, compile this and test it. Once your gold drops below 200 you will see the button disappear, which means the communication was succesful!
I have put the code of the UI that has been talked about in this tutorial in this github repository
Some tips and tricks for flash:
//make an instance of the object first
var module:ExampleModule = new ExampleModule();
//initialise it
module.setup(gameAPI, globals);

//add the module to the stage
this.addChild(module);

//if you want to remove it again:
this.removeChild(module);